Worksheet Designer
Worksheets are the forms, lists and documents your agency builds for itself: a rig check, an incident report, a pre-plan, a sign-up sheet. The Worksheet Designer is where you make them.
Where: ModulesWorksheet Designer
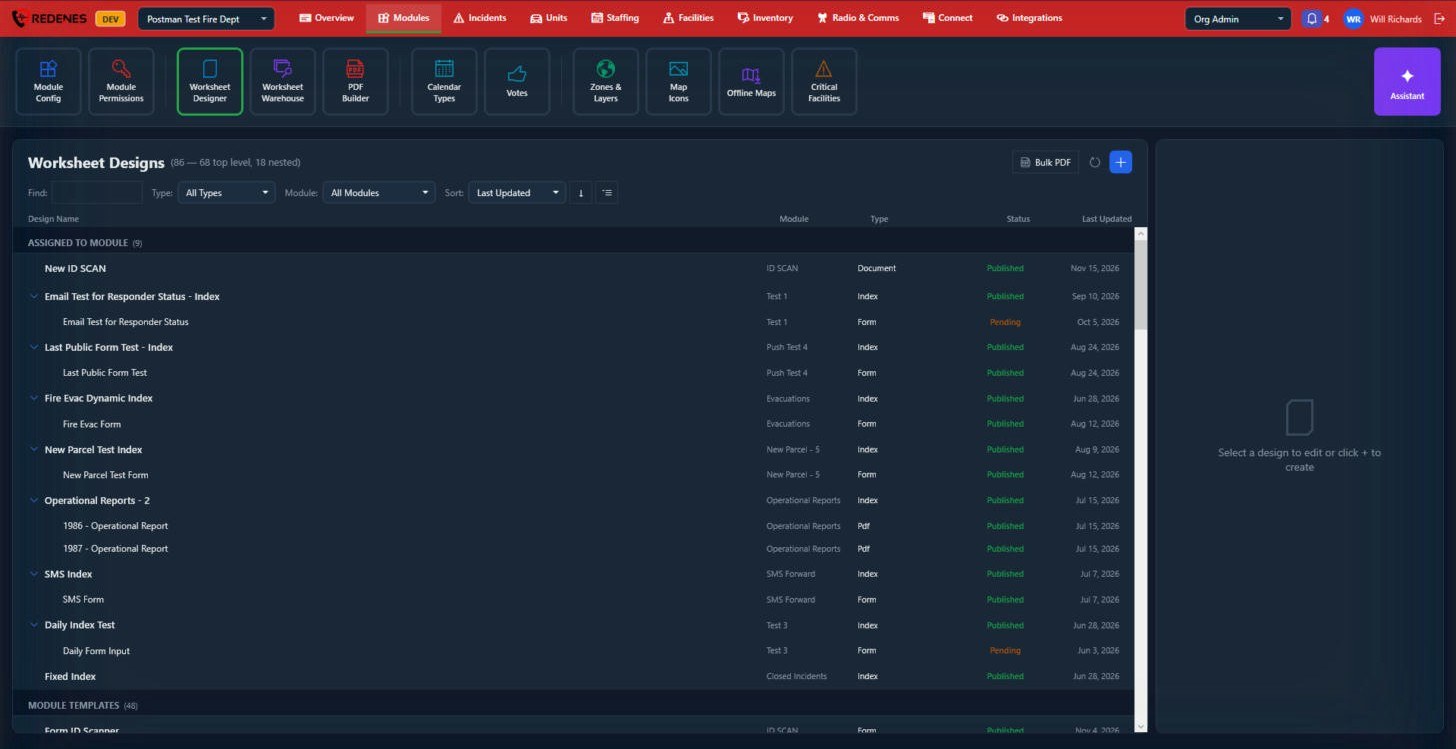 123
Find a design 1
Type in Find, or narrow by Type, Module and Sort. Designs are grouped under Assigned to module and Module templates. An arrow beside a design means it has nested designs under it, for example an index with the form it opens.
The columns 2
| Column | Meaning |
|---|---|
| Module | The app tile that opens this design. |
| Type | Index (a list of entries), Form (something to fill in), Document or Pdf. |
| Status | Published is live in the apps. Pending has changes that are not published yet. |
Make or change a design
Click + 3 for a new design, or click an existing one. Its settings open on the right.
Bulk PDF, beside the +, takes a stack of PDF files and turns each one into a worksheet design.
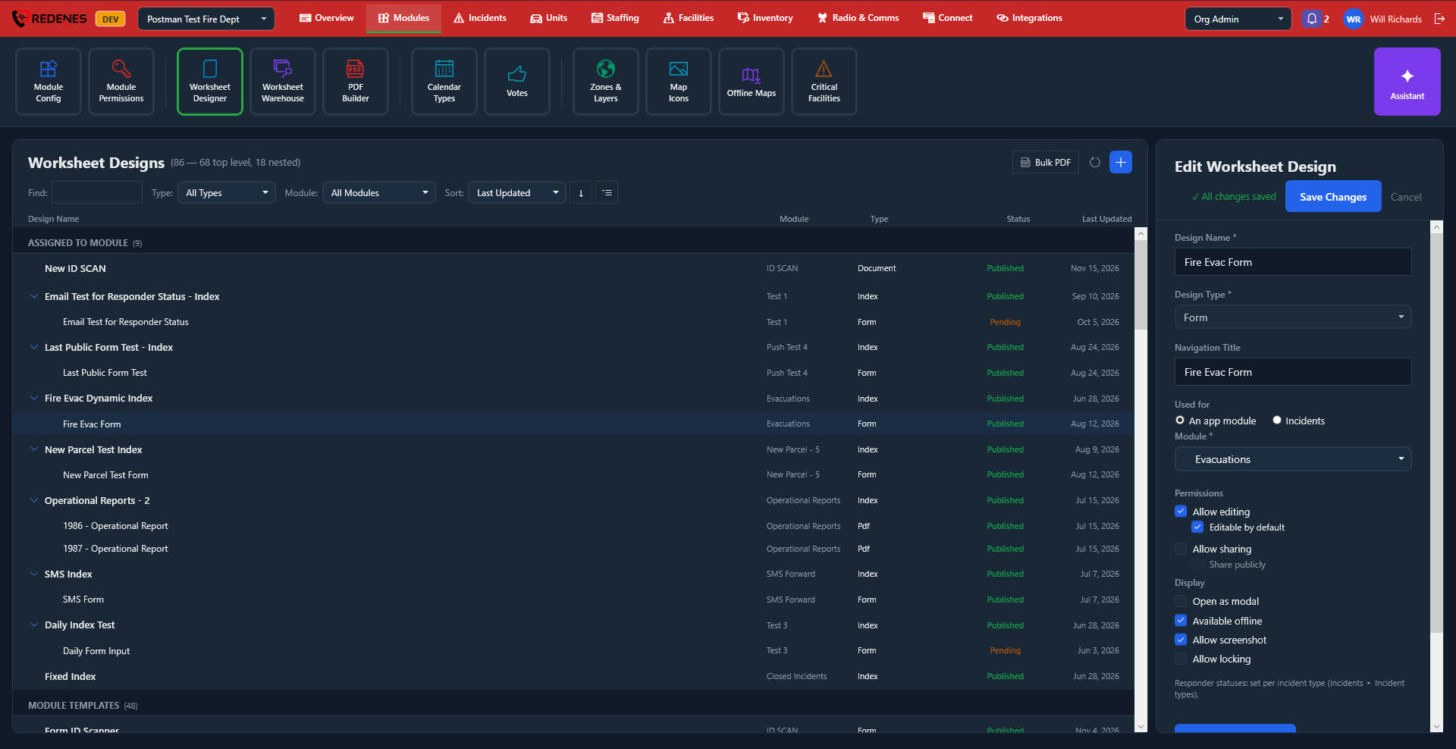 123456
- The design you clicked 1 is highlighted.
- Design Name, Design Type and Navigation Title 2: the name in this list, whether it is an Index, Form, Document or Pdf, and the title shown at the top of the screen in the apps.
- Used for 3: An app module, then pick the Module, or Incidents.
- Permissions 4:
| Setting | Meaning |
|---|---|
| Allow editing | Entries can be changed after they are saved. |
| Editable by default | A new entry opens ready to type in. |
| Allow sharing | Members can share an entry with other people. |
| Share publicly | People outside the agency can open and fill in the form through a link. |
- Display 5:
| Setting | Meaning |
|---|---|
| Open as modal | Opens on top of the current screen, not as a new screen. |
| Available offline | Phones keep it for use with no signal. |
| Allow screenshot | Members may take screenshots of it. |
| Allow locking | An entry can be locked so it cannot be changed any more. |
- Save Changes 6 saves these settings.
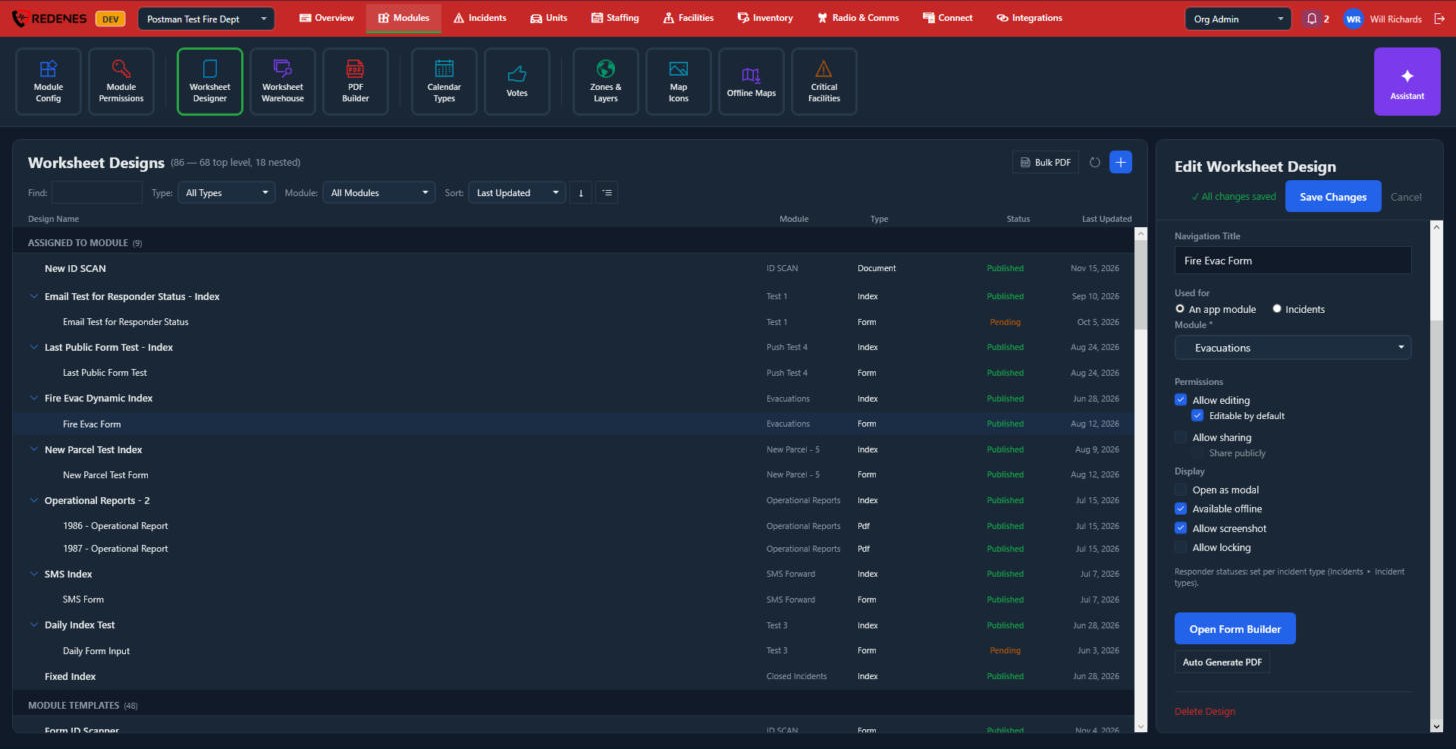 123
- Open Form Builder 1 opens the builder, where you lay out the form itself.
- Auto Generate PDF 2 makes a PDF template from this design. See PDF Builder.
- Delete Design 3 removes the design.
The Form Builder
The builder opens in its own window.
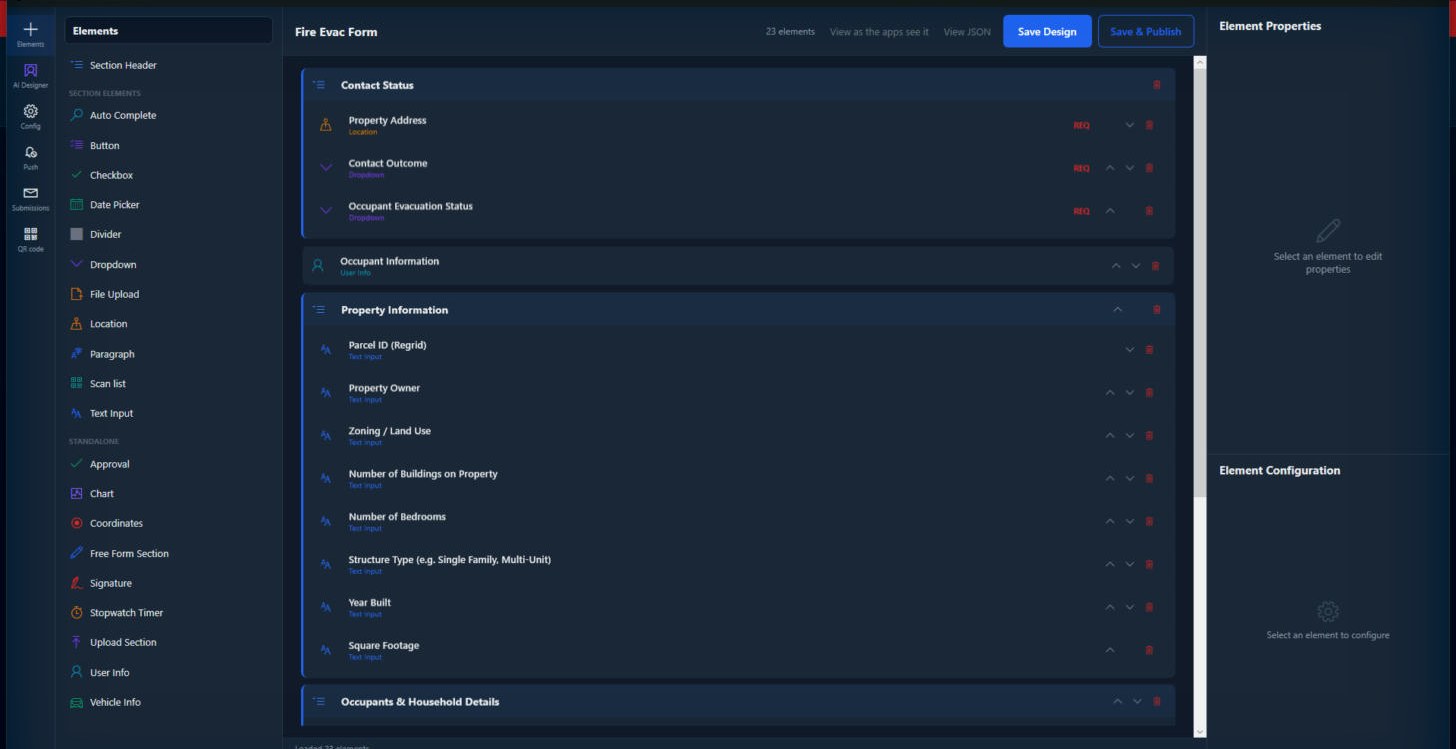 12345
- The rail on the left 1 switches between Elements, AI Designer, Config, Push, Submissions and QR code.
- Elements 2: click an element to add it to the form.
- The form 3: sections with the elements inside them. The arrows on the right move a row up or down, and the red bin deletes it. REQ marks a field that must be filled in.
- View as the apps see it and View JSON 4: a preview, and the raw design for support.
- Save Design keeps your work without changing what members see. Save & Publish 5 sends it to the apps.
The elements:
| Group | Elements |
|---|---|
| Section Header | Starts a new section. Most elements go inside a section. |
| Section elements | Auto Complete, Button, Checkbox, Date Picker, Divider, Dropdown, File Upload, Location, Paragraph, Scan list, Text Input. |
| Standalone | Approval, Chart, Coordinates, Free Form Section, Signature, Stopwatch Timer, Upload Section, User Info, Vehicle Info. These sit on their own, outside a section. |
One element's settings
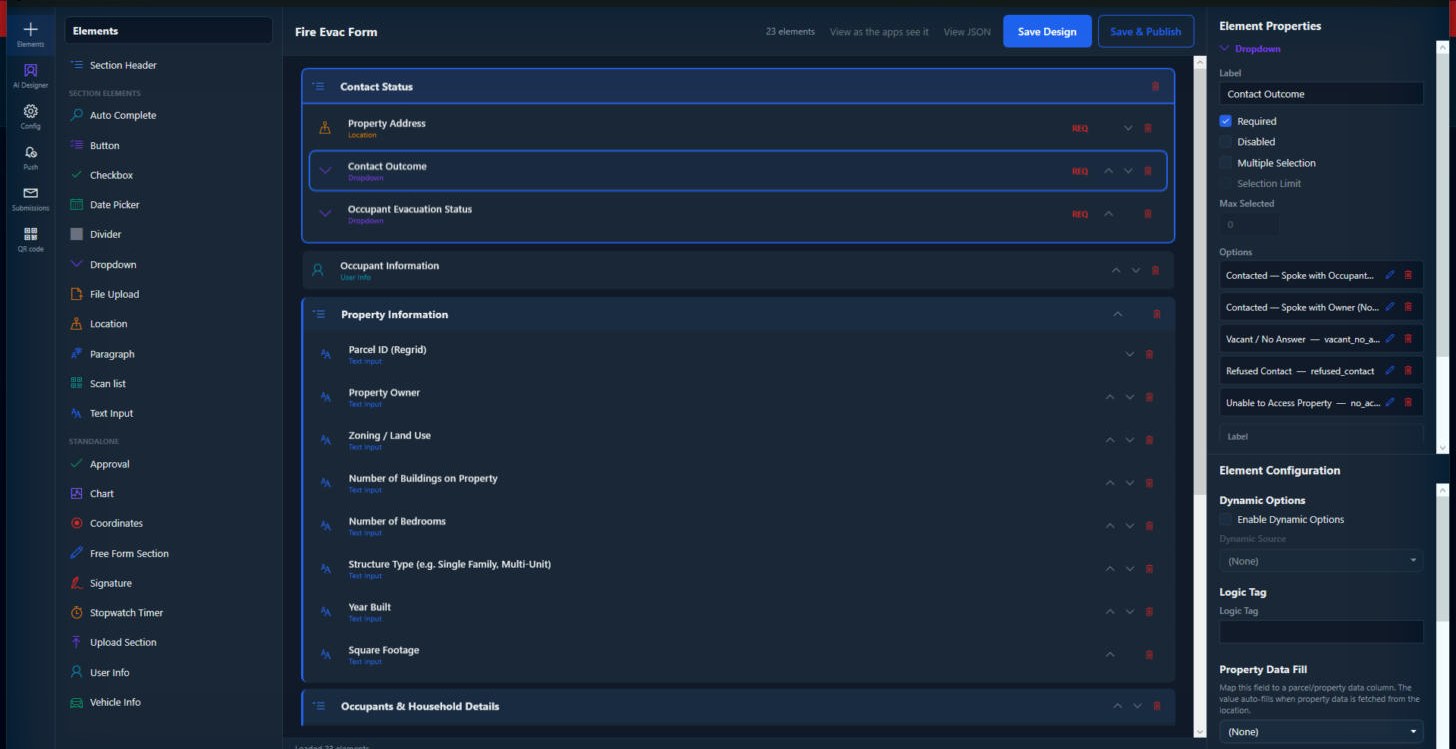 123
Click an element in the form 1.
- Element Properties 2 change with the kind of element. For a Dropdown: the Label, Required, Disabled, Multiple Selection with a limit, and the list of Options, each with a pencil to change it and a bin to remove it.
- Element Configuration 3:
- Dynamic Options fills the choices from a live list.
- Logic Tag gives the field a name that other parts of REDENES can refer to.
- Property Data Fill fills the field from parcel data once the form has a location.
AI Designer
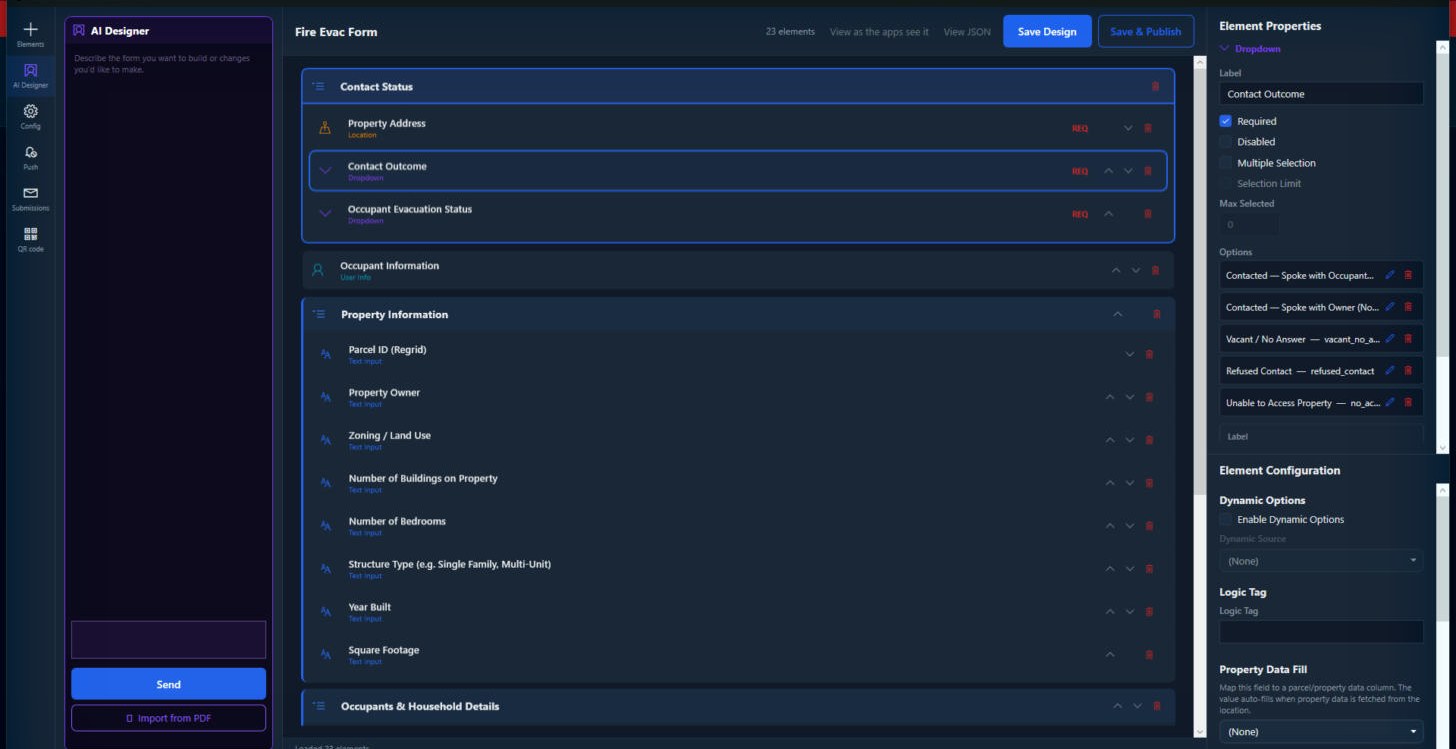 12
Describe the form you want, or the change you want, in the box and click Send 1. Import from PDF 2 reads a PDF form and builds the elements from it. Check the result in the form before you save.
Config
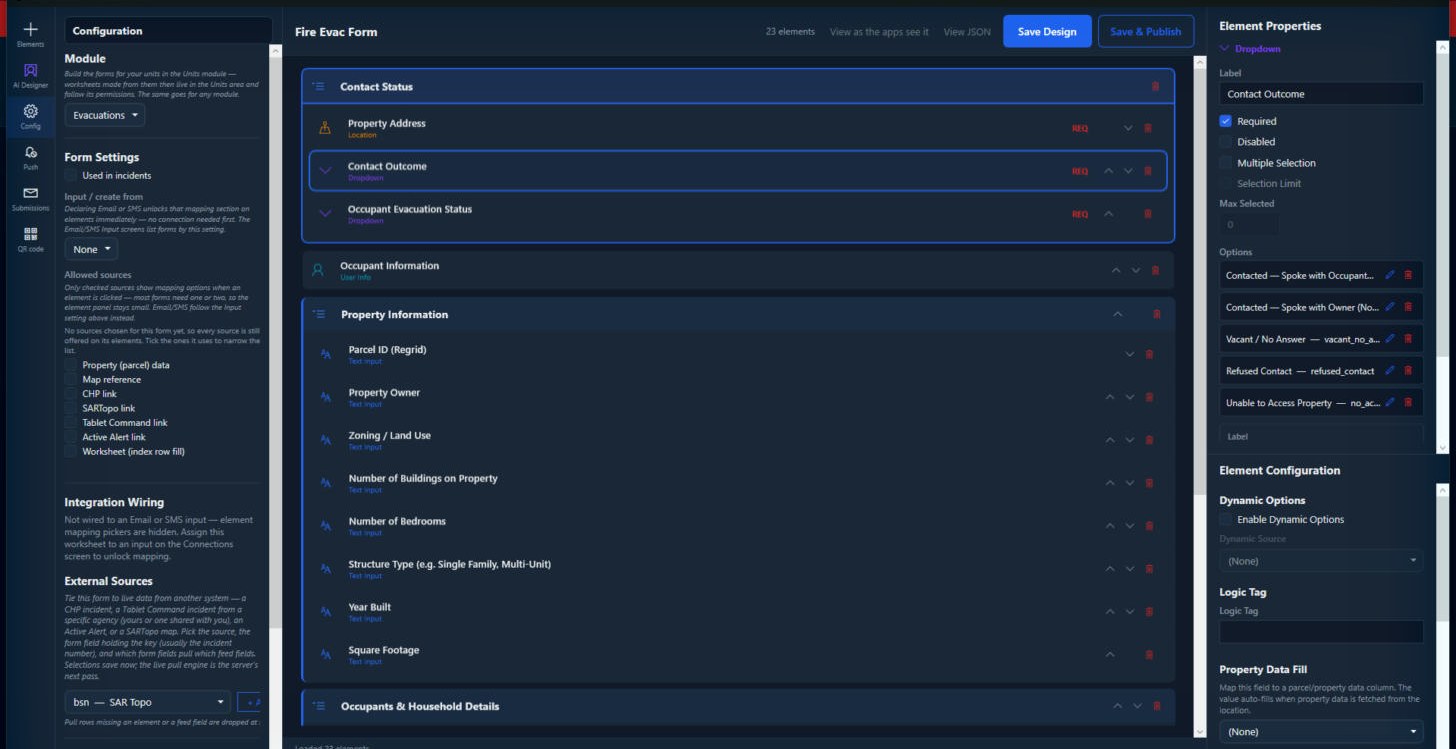 1234
- Module 1: the module this form belongs to. It follows that module's permissions.
- Form Settings 2: Used in incidents, whether entries can be created from an email or a text (Input / create from), and the Allowed sources an element may be filled from: parcel data, a map reference, a CHP, SARTopo, Tablet Command or Active Alert link, or another worksheet.
- Integration Wiring 3 shows whether the form is connected to an email or text input.
- External Sources 4 ties the form to live data from another system.
Push
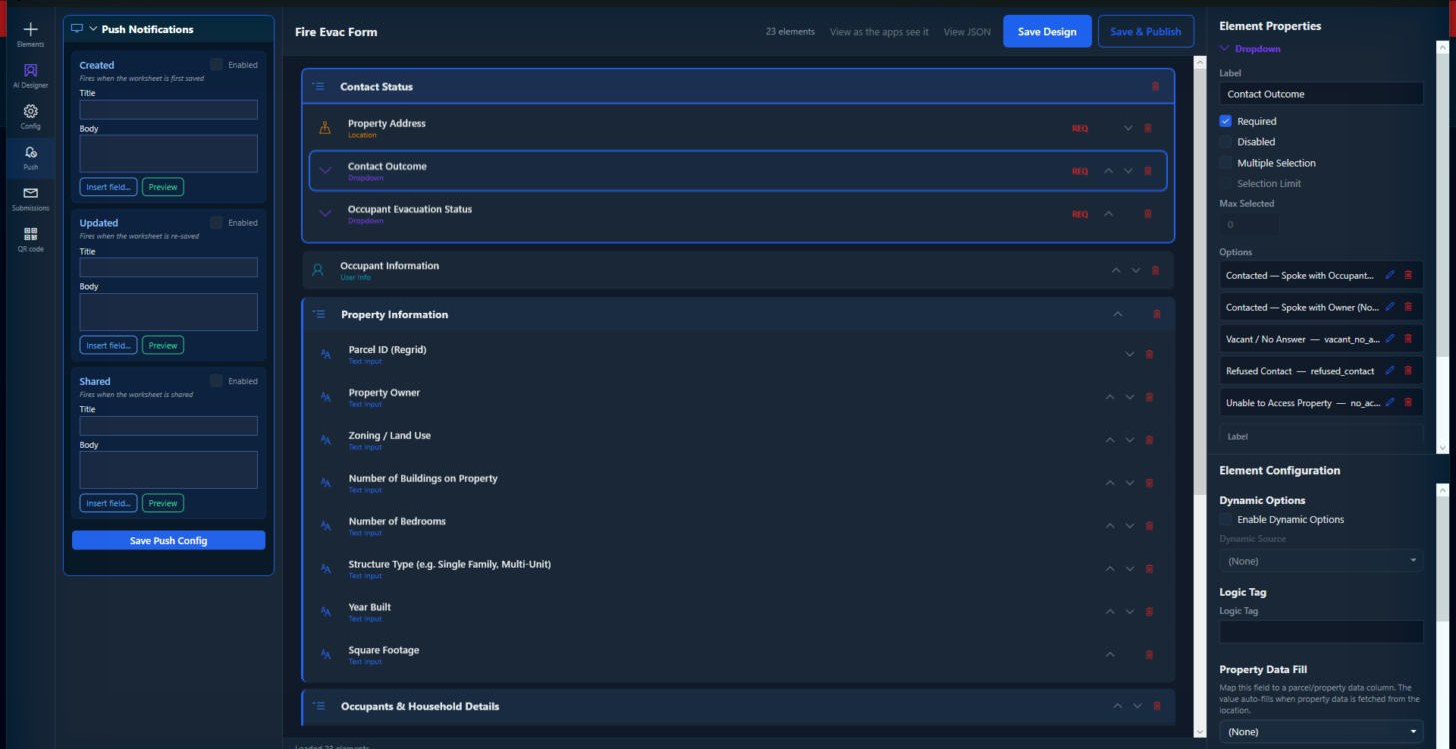 1234
The notification text for this worksheet. There is one block 1 each for Created, Updated and Shared. Tick Enabled 2, type a Title and Body, and use Insert field 3 to put a value from the form into the text. Preview shows the result. Click Save Push Config 4.
Submissions
For forms that are shared publicly.
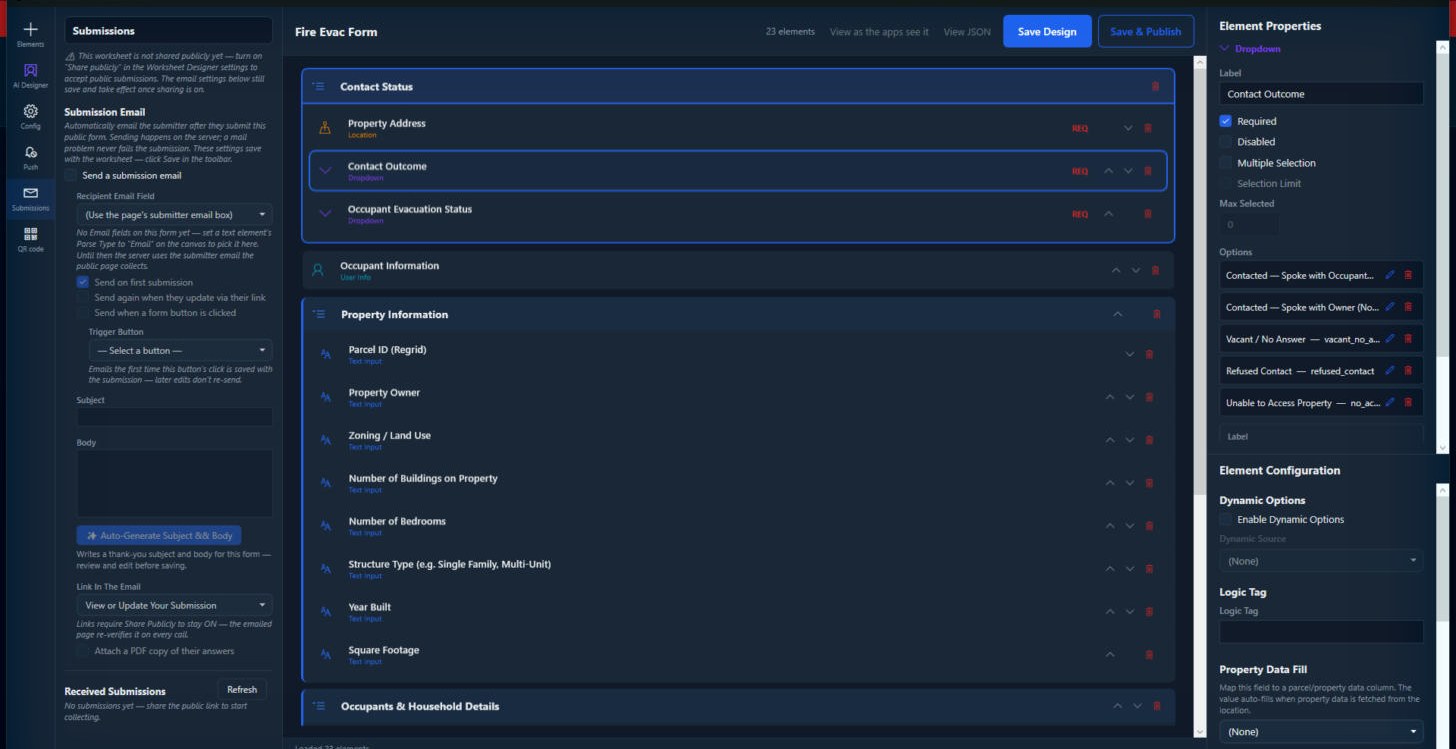 123456
- Send a submission email 1 emails the person after they submit the form.
- When it is sent 2: on the first submission, again when they update it, or when a button on the form is clicked.
- Subject and Body 3. Auto-Generate Subject & Body 4 writes a thank-you for you to review.
- Link In The Email 5 lets the person view or update what they sent, and you can attach a PDF copy of their answers.
- Received Submissions 6 lists what has come in.
These settings save with the design.
QR code
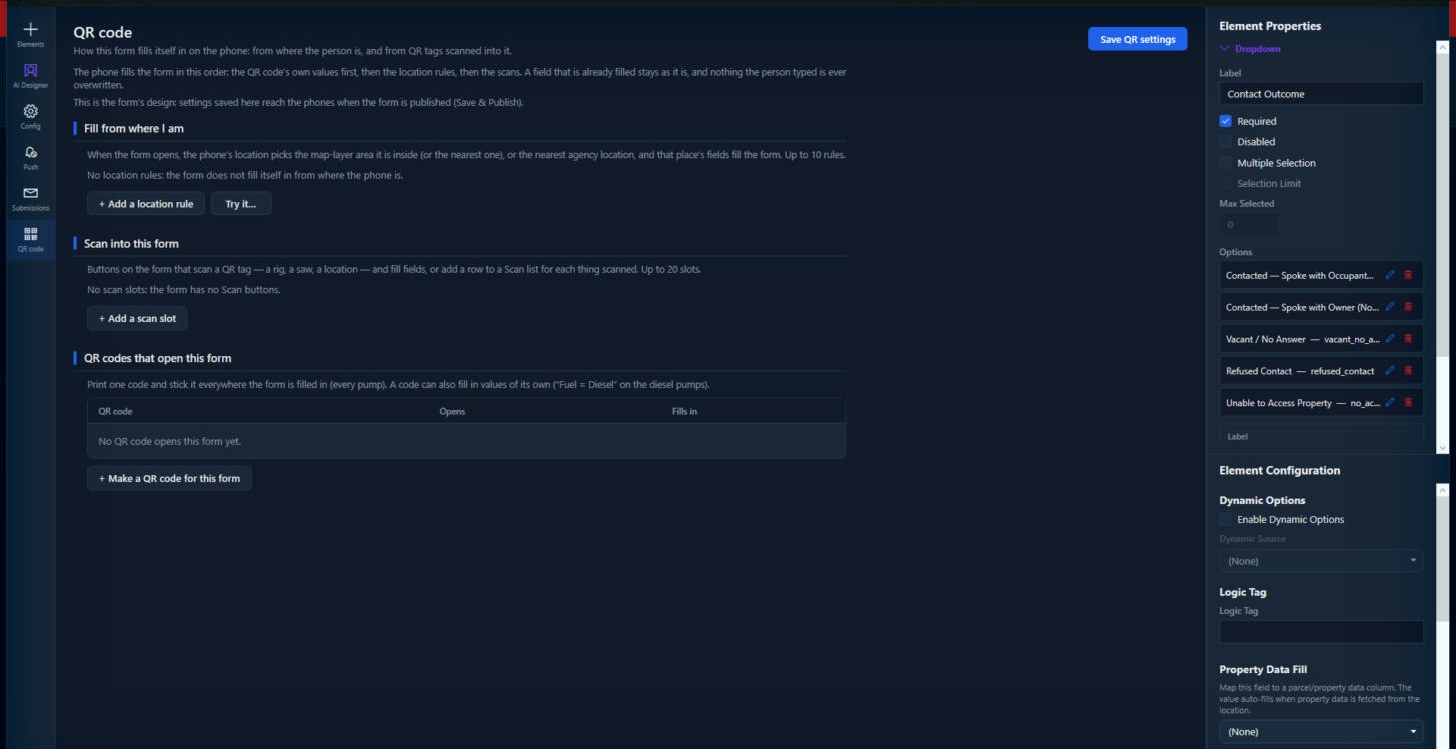 1234
How the form fills itself in on the phone.
- Fill from where I am 1: rules that fill fields from the map area or agency location the phone is in. Try it tests a rule.
- Scan into this form 2: buttons on the form that scan a QR tag, such as a rig or a saw, and fill fields or add a row for each thing scanned.
- QR codes that open this form 3: make a code to print and stick wherever the form is filled in. A code can also fill in values of its own.
- Save QR settings 4. They reach the phones when the form is published.
Check it before you publish
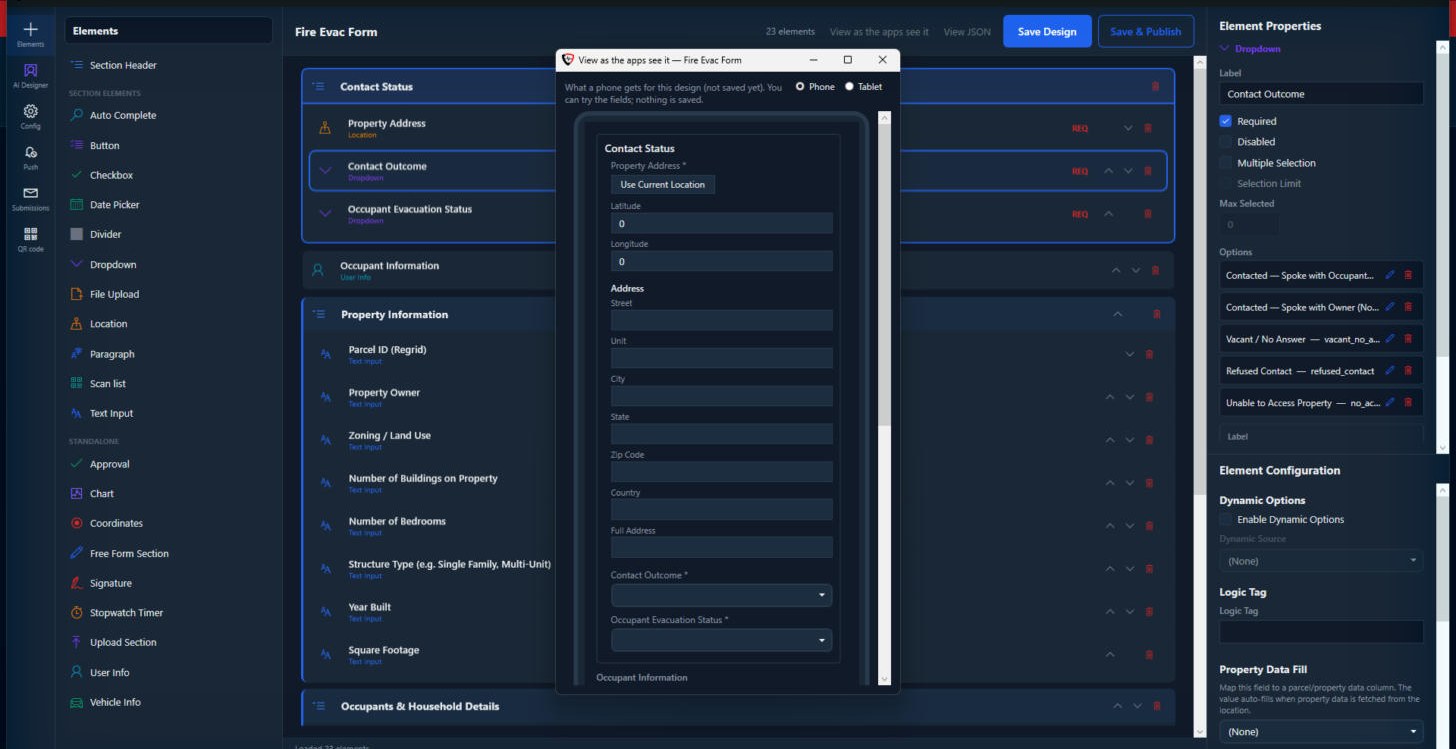 12
View as the apps see it shows the design as a Phone or Tablet 1 gets it. You can try the fields 2. Nothing is saved.
When it is right, click Save & Publish. Until then members keep seeing the last published version.
The Worksheet Warehouse has ready-made designs, including the ICS forms, that you can copy and adjust.